Sunday, January 23, 2005


This is the start of a fairly large Durisol project. Durisol is a cement and wood chip mixture that is molded like a giant concrete block. Every Durisol job we have installed had the rockwool slab in each core...makes for plenty of itching in the hot summer sun. Posted by Hello

This is a barn shaped house with Rastra. VBuck was used for the openings except the saferoom/storeroom outside on the right of the house. This was done in two form and pour operations, first pour was to just above the floor line then the gables done after the floor system was in place. We used a tractor with forks to lift the blocks up to the second floor. We applied Grailcoat to the exterior of this house. With Rastra, we place the concrete VERY fluid, we are basically using a flowable fill type mixture, we capped the lower parts of the gables with 2x and then decided to struggle with the upper with staples.  Posted by Hello

This is what the foam and precast system is replacing. Posted by Hello

This is a look at the underside of the system just after it was poured above. What you are seeing is the foam and the precast concrete beams that are shored at about 6' on center in this application. Posted by Hello

Here is a site with the precast members, the foam fillers, conduit and ties all ready to go up on a floor/flat roof application. Posted by Hello

This is an end view of the precast beams. They are only a couple inches thick with what looks like large bolsters for reinforcing. The wire that is above the concrete will tie the beam to the rest of the roof concrete. Posted by Hello

These are forms for casting the concrete beams in. They look like C-purlins but the cross members are hinged. Posted by Hello

These are foam panels that are cut from block foam for use in the site precast floor and roof system. The lip on the edges of the foam sit on the precast concrete beam. Posted by Hello

This is another shot of a rooftop prior to concrete. Posted by Hello

Here is an upper view of a roof as shown earlier prior to placing concrete. The orange tubing is conduit for electrical Posted by Hello

Monday, January 17, 2005


This is your typical country style farm house with a full front porch and a second story that falls within the roofline of the gables.  Posted by Hello

This is the start-up of that gable, you see, we try to precut the entire gable on the ground, number the forms and toss them up as we go. If we have a windless day, we can glue the forms together in large sections and hand them up. Posted by Hello

This is an average gable. We like to use the WASS bracing for gables like this because you can set scaffold heights as needed as well as extend turnbuckles as needed also.  Posted by Hello

This is the front of one of the units. What you may be able to discern is the number and size of voids...Some were filled but not completely. Also, the fire burned the foam but left the ledger intact and the wood bucks. They suffered heavy charring, but as the arson investigator said "fire is lazy it will burn the easy fuel first" The fire burned the foam clean off of the concrete on both sides. Most of the floor joists are in the foreground....heavily charred. The idea that the walls can be reused didn't last long on this one, they paid a hefty price to knock it all down and take it away. Posted by Hello

Here is a shot of an ICF building that burned...it wasn't complete. If I remember correctly, they were trying to get past the close-in inspection so that they could sheetrock the interior. The exterior had basecoat for an EIFS finish. The guy that owned the white car parked in the wrong place that day! The fire sure exposed a ton of voids in the fire walls...didn't matter though, it was an arson job and fuel had been dispersed in more than one unit. Posted by Hello

Sunday, January 16, 2005


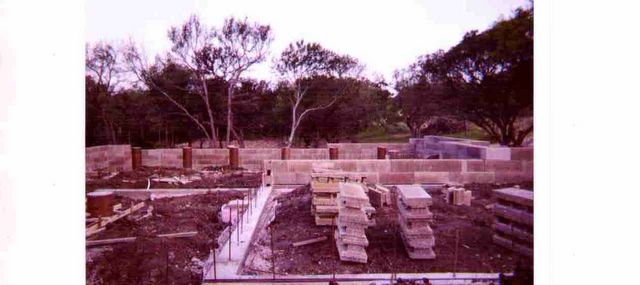
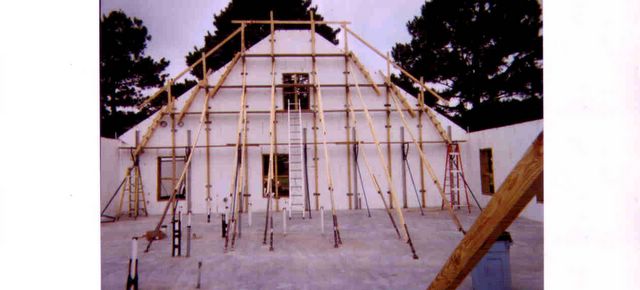
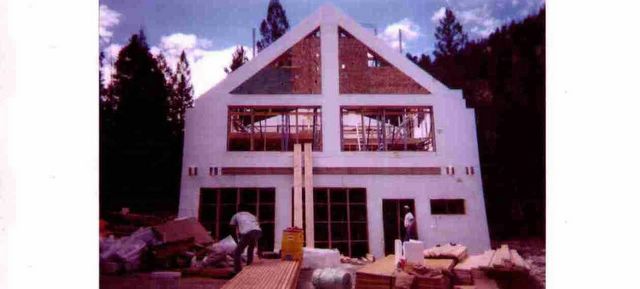
Not the average gable, this was all 8" concrete and not seen is the 4' frost wall behind the materials. We put up the walls, framed most of the interior framing, decked the roof and set the heavy as hell windows in about 18 days with a five man crew. This was just over a truckload of forms and slightly remote in Colorado. We poured to the bottom of the windows on the first go round, I think that was about 16' tall, then went to 20 or 22 foot on the second pour to the top of the gable. The back wall was to a lower pitch gable, this one in front I believe was a strange pitch due to the window sizes but was in the neighborhood of a 12:12 The ledger above the garage doors is for a porch or main entry level during the winter months! I think this one was at about 9500 ft. Had to rent a stinger to set the ridge beam. Posted by Hello

This is a picture of a saferoom added as an integral part of the exterior walls of a home. Unfortunately, I don't have any pictures showing a commercial application of a saferoom, but we find this to be a smart sell in the commercial world...especially small businesses that are basically building metal buildings and putting a fancy facade on the front....a place to put the computers and records that is clean and safe.....oh yeah, maybe some money too! Posted by Hello
If you are planning on building an ICF home, you ought to plan on at least putting a saferoom into it. We promote building in a secure room....security for firearms, security for valuables, papers and of course the family. If costs are a concern, if you can locate the room where it becomes an integral part of the exterior walls, then the cost to add the room is minimal especially since most of the material and pump will be there anyway. Your main expense is the door. Posted by Hello

Here's a joy of a project. The swimming pool in the foreground is actually sitting on the slab of the basement below and is also of ICF construction. The window in the pool is so that one may view the swimmers from the winecellar.. The turret is about 45' tall. Posted by Hello

This is the same project with the basement level backfilled and the first story walls up, one more story to go... Posted by Hello

Here's another way of building a flat roof...in this case, we were building a floor system on a basement. This lot was "unbuildable" until we put the basement on it. These are plain red iron bar joists with a metal decking and 4" of lightweight concrete. Posted by Hello

Here is the front of the house prior to backfilling the basement the view is from street level. Posted by Hello

This is our mainstay hose for a boom pump. The boom is reduced at the last 90 from 5 to 4 and 4 to 3". We then use 4" discharge hose slipped over the 3" reducer and clamped without the gasket. You may have to warm the hose up on the exhaust of the pump in order to get it to slip over the 3" coupling. We cut this hose at about 12' and trim off the clamped end each time we use it. It will make for an easy placement job since the hose man can direct the concrete perfectly...eliminating any spills etc. This hose also can make a mediocre pump operator look good since the hose man can move it freely unlike the regular tip hoses that the pumps carry.  Posted by Hello

Nice thing about ICF is that you can make perfect curves. This was 14" concrete with a ton of reinforcing. Posted by Hello

This is the "downhill side" The creek is about 50' below us at this point Posted by Hello

This is the end of the serpentine retaining wall that is below the curved walls that were posted earlier. At this point, the wall is only about 4' tall but it goes up to a high point of about 14'. In roughly 240', only about 20' of the wall is actually a straight wall..... Posted by Hello